>> The Challenge:
We often need to create or edit entities whose location depends on the location of existing entities. A typical and very common example is the creation of orthographic views. The entities in the top and side views must align correctly with their corresponding entities in the front view.
>> The Reality:
Entity alignments have traditionally been established through the use of temporary construction geometry, which is then erased when we no longer need them. This technique is not new to CAD, but goes back to paper-and-pencil days. The problem is that the creation and subsequent deletion of these temporary construction entities takes time.
>> The Solutions:
There are actually two possible solutions to our current problem.
First, one helpful trick is to set up a Construction layer and then place all construction geometry on it. The good news is that it is very simple to delete the construction entities. All you need to do is to freeze all layers except Construction, erase all entities (Erase > All), and then thaw all the layers.
The bad news is that it still takes time to continually switch back and forth between entity layers and the construction layer, plus the time it takes to delete the construction entities.
However, it is not necessary to delete the construction objects. In fact, it is probably best that they still be available for future editing. The trick here is to go to the Layer explorer and either click on Yes in the Print column beside the construction layer name, toggling it to No, or you can freeze the construction layer. In either case it won’t print.
…And My Point Is…
The second, and often simpler, solution is to use coordinate point filters. These are very easy to use but are often overlooked because there are no menu, toolbar, or shortcut picks for them.
As is often the case, it will be easier to walk through a demo rather than trying to explain things.
Our assignment is very simple: we need to draw three orthographic views of a brick. We could just use the Rectangle command, but that won’t be as appropriate for demonstrating the current principle.
Instead, turn Ortho on, set a running entity snap of ENDpoint, start the Line command, and pick a start point. Move the cursor a suitable distance to the right and enter the value 3 as the length for this first line.
Now move the cursor up and enter the value 1.5 to create the line segment to the third point. You should now have an L-shaped figure on screen.
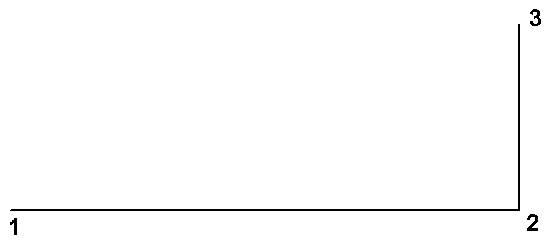
So far, so good. The tricky part now is figuring out where to place the fourth point so that it is located directly above the first point. Actually, it isn’t hard at all. Simply type .x (a period and then the letter x) and press Enter. The prompt now asks you to “Select X of:”
Use the ENDpoint entity snap to select point 1, the starting end of the first line segment.
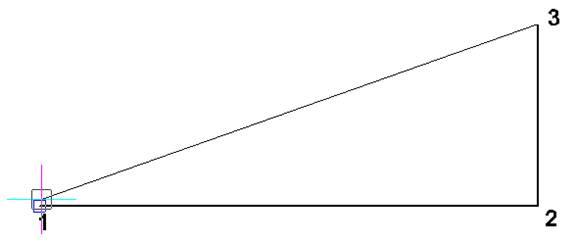
Figure 2: The .x point filter is applied to point 1.
Surprise! It does not draw a line segment from point 3 to point 1. Instead, the prompt then advises “Still need YZ of:” Pick a point in the general vicinity of where you think the third line segment might end and the third line segment is drawn. It is exactly the same length as the first segment, and its endpoint is directly above (it has the same X coordinate as) the original starting point.
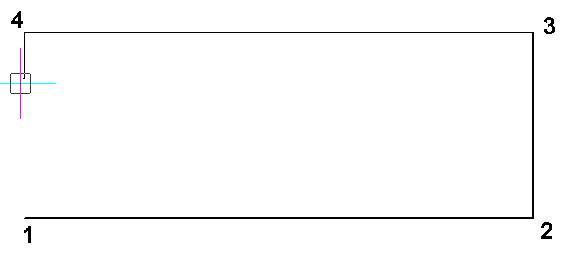
Figure 3: Point 4 is generated from the x-coordinate of point 1.
Enter C to close the line sequence, and you have a perfect rectangle.
Did you see what happened here? The .x entry was a coordinate point filter – or, more simply, a point filter. When you snapped to the ENDpoint of the first line it read the coordinates of the selected point, extracted the X value, discarded the Yy and Z values, and asked you to supply the latter two coordinate values separately. When you picked the random point, it discarded the X value and combined the Y and Z values with the previously-determined X value to produce a coordinate triplet for point 4. The resulting line segment was horizontal because Ortho was On.
Now let’s draw the top view of the brick, perfectly aligned with the front view.
Start the Line command. Don’t pick the start point yet, but instead apply the .x point filter and snap to point 4. You won’t get the usual rubber-band line, because you aren’t actually drawing the line yet. All you have is the X coordinate of its start point.
Move the cursor up a suitable amount and pick a point. You have now supplied the Y and Z coordinates and so point 5 is the actual start of the new line.
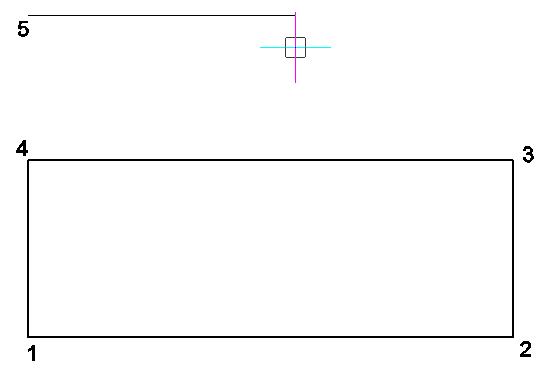
Figure 4: A .x filter applied to point 4 supplies the x coordinate for point 5.
Continuing in a similar vein, .x of point 3 defines point 6.
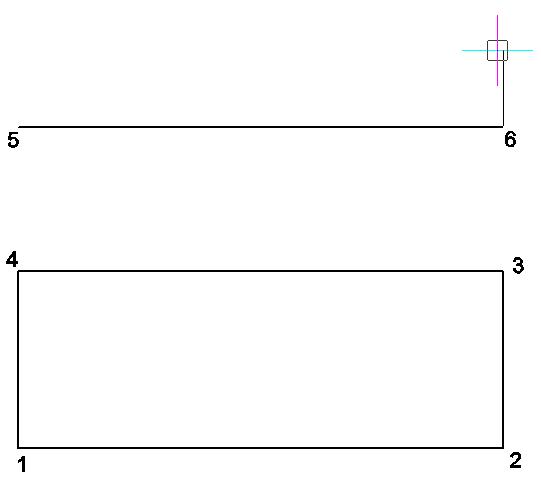
Figure 5: The top view is projected from the front view by using point filters.
Point 7 is 1 unit above point 6, a .x filter on point 5 produces point 8, and you can then Close the line segments.
One Good Turn…
Now it’s time to draw the right-hand view. This requires a turning line A-B, the one and only construction line of the exercise.
Start it at a suitable point, with a length of about 3 units and at a 45-degree angle.
Now comes the really cunning part. Start the Line command again, and filter the .y value of point 2. Previously we were just picking a “suitable” point to obtain the other two coordinate values, but this time we are going to use the INTersect entity snap. Invoke it, and pick line 5-6 followed by our turning line A-B. That’s right, the INTersect entity snap does not require that entities actually touch each other, it can also find their theoretical intersection point if they were suitably extended.
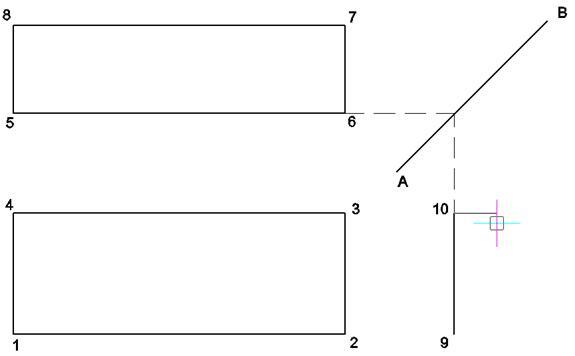
Figure 6: We can filter coordinates around a turning line.
Through this process we have determined the Y coordinate of point 9 from point 2, and its X coordinate from the theoretical intersection of lines 4-5 and A-B. We have projected and turned the lines without having to use any construction lines. The dashed lines in figures 6 and 7 don’t actually exist. I added them simply to show you what we effectively did.
Make sure Ortho is still On, and continue:
Point 10 Y value comes from point 5,
Point 11 X value comes from the INTersection of A-B and 7-8
Point 12 Y value comes from point 2 or 9.
Close back to point 9.
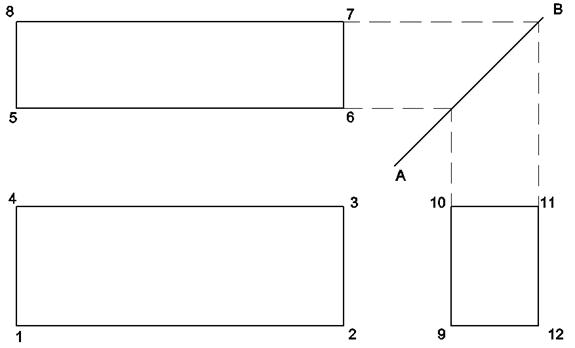
Figure 7: The finished views.
And there you have it. By using point filters we created three perfectly-aligned orthographic views without any construction lines except for the turning line, and we never had to repeat a specific size input. We entered the width, depth, and height just once and obtained all their equivalents in the other views through point filtering.
This was a relatively trivial example, but it served to demonstrate most of the significant details of point filtering. Through it you have learned how powerful and yet how simple point filters are.
Notes to you: Now that we have seen the basic operation, let’s look at the details.
Coordinate point filters can be used any time you need a point. This includes such times as specifying either an end of a line, the center and/or radius of an arc or circle, the start and/or end points for a Move, Copy, or Array operation, and so on.
Entity snaps are honored during point filtering.
You can type in specific values when asked for a filtered location.
All point filtering is relative to the current UCS.
Any rotation of Snap or Grid is ignored.
Coordinate point filters also work in 3D and in pairs as well as singly. For example a .xy filter extracts the X and Y coordinates of the selected point and then requests the Z value, while .xz extracts X and Z and then requests the Y value.
You can apply point filters individually when defining a single point. The X coordinate can come from one location, the Y from a second, and the Z from a third.
>> Command review:
There are no specific commands related to coordinate point filtering, and all filters must be typed in at the keyboard. All possible combinations are allowable:
- .x extracts the X coordinate.
- .y extracts the Y coordinate.
- .z extracts the Z coordinate.
- .xy extracts the X and Y coordinates.
- .xz extracts the X and Z coordinates.
- .yz extracts the Y and Z coordinates.

