>> The Challenge:
Everyone knows that using entity snaps is essential in the creation and editing of accurate drawings. With them, we can precisely draw a new entity that exactly snaps to the ENDpoint of an existing line, the CENter of a circle, and so on, but there is one that is often underused because people don’t understand its full definition.
>> The Reality:
Most of the entity snap modes are quite straightforward. After all, names like ENDPoint, MIDpoint, and TANgent pretty much describe what they do. On the other hand, the PERpendicular entity snap is much more powerful and versatile than most people suspect.
>> The Solution:
It all began in high school. Your Oxford Dictionary defines “perpendicular” as:
“1. Situated at right angles to the plane of the horizon, or directly up and down”.
Most likely everyone agrees with this definition. If you were asked to draw two perpendicular lines, most of you would draw something like Fig. 1.
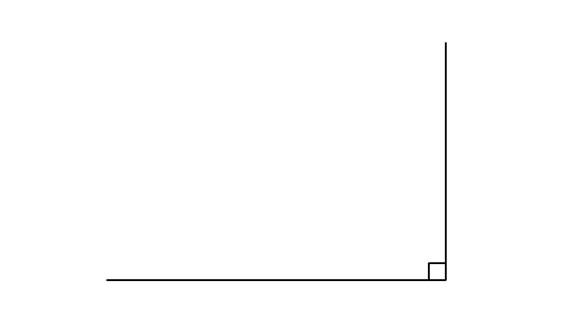
You have seen this illustration many times in typical geometry textbooks. The vertical line is perpendicular to the horizontal line because the little square in the corner tells you so. The problem is that you have seen such an illustration so many times that you have come to assume that a perpendicular line is always vertical, and is perpendicular “upward” from a horizontal line, and the lines touch at their ends.
Let’s take a look at the next part of the dictionary definition:
“2. Geom. Of a line or plane: Having a direction at right angles to a given line, plane, or surface.”
The important thing to note here is that there is no reference to vertical or horizontal.
Now look at Figure 2. Neither line is horizontal or vertical nor do they touch at their ends, but they are perpendicular.
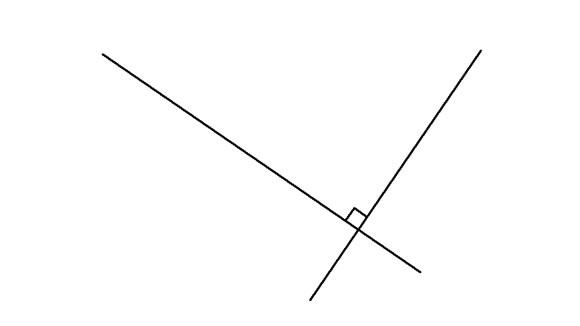
Figure 2: These lines are also perpendicular to each other
In fact, it is not even correct to refer to one line as the “perpendicular” one; strictly speaking, two lines are perpendicular to each other if they are at 90 degrees to each other. The traditional textbook diagram gives you a much narrower mental image of the subject, even though you may even remember the words of the definition.
Continuing to explore, you notice that the definition did not say that the lines actually had to meet.

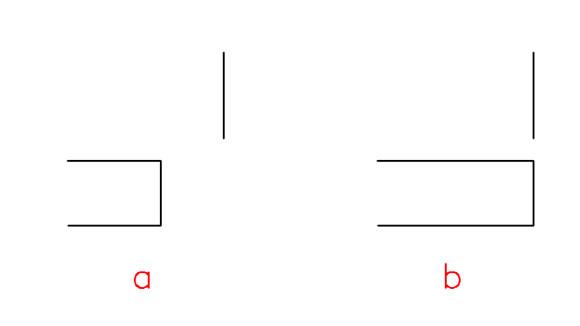
Figure 3: These lines are also perpendicular to each other
Figure 3a shows two lines that are perpendicular to each other. If the lines don’t actually meet, then the PERpendicular entity snap finds the theoretical point in space where the lines would meet if they were extended, as shown in Figure 3b.
Now let’s look at Figure 4. Nobody said both lines had to be straight.
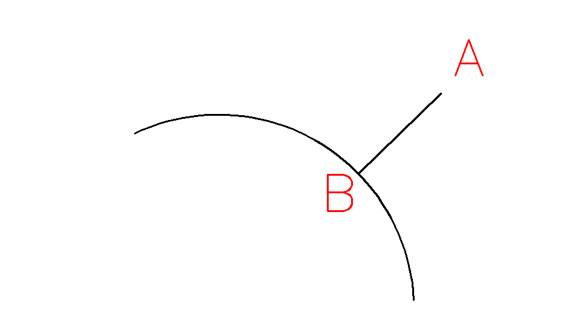
Figure 4: The line is perpendicular to the arc
The straight line is perpendicular to the arc at the contact point, and hence the line is the shortest possible one between point A and the arc. Point B lies on the straight line that connects point A to the centre of the arc. To draw it, simply start the Line command and pick a suitable first point. To define the next point use the PERpendicular entity snap and select the arc. Obviously, this also works for circles and it also works if the line radiates outward from inside the arc or circle.
You have certainly wandered a long way away from your original pre-conception of exactly what constitutes “perpendicular”. Okay, it’s time for another shift in your thinking.
You are not restricted to the LINE command when you use the PERpendicular entity snap. Like all other entity snaps, it can be used at almost any time that you are asked for a point, and will result in the action taking place at the theoretical “perpendicular” point. Consider Figure 5a, which shows a line and a circle.
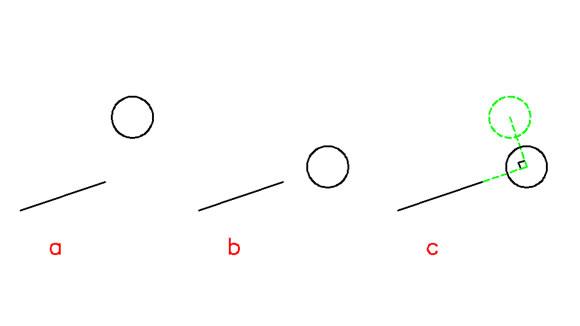
Figure 5: The PERpendicular entity snap also works during the MOVE command
You can use the PERpendicular snap during the MOVE command to produce Figure 5b, where the CENtre of the circle has been MOVEd to the point that is PERpendicular to the extension of the line, as in Figure 5c.
The PERpendicular entity snap can be used during almost any editing command, such as STRETCH (Figure 6), MIRROR, COPY, and so on.
It can also be used during inquiry commands such as DISTANCE and to obtain a distance for the OFFSET command or for the ARRAY command. In every case it will return the point where two perpendicular entities would meet, even if it has to extend either or both entities to produce a theoretical meeting point.
Notes to you: The PERpendicular entity snap is one of the most powerful and versatile of all the entity snap modes. The others all pretty well behave “as advertised”; what else would you expect from modes such as CENter, MIDdle, END, INTersection, NEAr, and so on? The PERpendicular mode, however, can take some interesting twists when we start to play with it.
>> Command Review:
The techniques used in this article apply to almost all entity creation and modification commands. Perpendicular is not a command, it is a command modifier and can be used within other commands whenever they are asking for a point.
- PERpendicular
- Keyboard: PER
- Context Menu: Shift+Right Click
- Toolbar: Entity Snaps
PERpendicular can also be set as a running entity snap through the Coordinate Input tab of the Drawing Settings dialog box:
- ESnap:
- Keyboard: ESnap or OSnap
- Status bar button: right-click ESNAP button, then Settings
- Menu: Settings > Entity Snap > Entity Snap Settings…
anted to mask out...

